
Not too long ago I got an email from SiteGround telling me that my web hosting was due to renew in 30 days—and that it was going to cost way more than I expected. Um, not okay. Web hosts tend to do that, you know. They offer highly discounted pricing for your first term and then the rates jump back up to their normal rates as soon as that term expires. Anyway, I researched my options and realized it was high time to switch to Bluehost. For a few reasons.
Why did you switch from SiteGround to Bluehost?
Honestly? I have zero complaints about SiteGround, other than their pricing being a bit higher than Bluehost’s (at least for what I needed). SiteGround prides itself on offering fantastic customer service and solid, reliable hosting. I feel like I got that from them.
But since my website doesn’t get millions of visitors monthly, I didn’t feel like I needed the premium hosting with the premium price tag. Besides, my other, brand-new website, May Contain Sugar, was hosted by Bluehost (because it was well-priced when I’d gone web host shopping months prior) and I thought the service I’d gotten from Bluehost was just as good. In fact, I even felt like Bluehost’s user interface was more intuitive.
At this point, I realized I could upgrade my plan with Bluehost and host both websites with the same plan. Such a money saver! So, as complicated as it might be, I knew moving Maurine Dashney from SiteGround to Bluehost would be worth it—at least for me.
Okay, so how did you make the switch?
I should start by saying that I am about as far from a web hosting expert as you can get. So much so that I feel like I have no business writing this! But here’s the thing: I didn’t want to pay someone to move my website from one host to another when I was doing so precisely to save money.
At first I was trying to follow this tutorial since I thought it applied to me, but after chatting with a Bluehost agent, I learned that the process was actually a lot simpler. And ultimately, I did it!
The process went more or less like this, with lots of help from Bluehost chat:
- Download your site’s database and backup files.
- Point your domain name to Bluehost instead of SiteGround.
- Assign the domain in Bluehost.
- Upload the website backup files and database to Bluehost.
- Contact Bluehost to have them extract the files and get your website up and running.
- Wait for all servers to update to your new host.
- Contact Bluehost to have them install your SSL.
Don’t worry—I’ll go through each one step by step.
1. Download your site’s database and backup files.
I had to do two different things to get these two things.
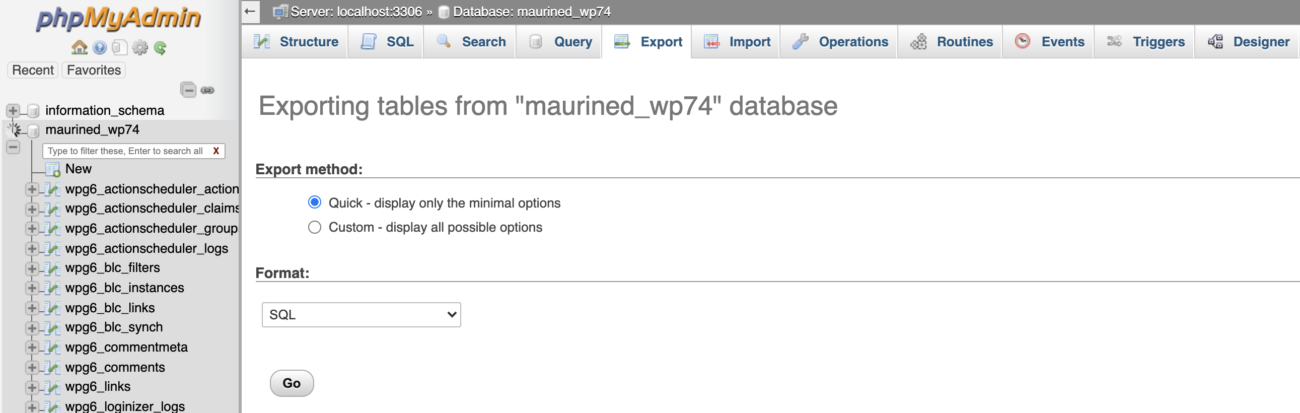
First, to download my site’s database, I logged into SiteGround and navigated to the cPanel. From there, I went to phpMyAdmin. Within phpMyAdmin, I went to the Export tab and hit “+” next to “maurined_wp74” over on the left so it would look at only my site’s database. I hit Go, and it downloaded an SQL file. (Keep this file!)
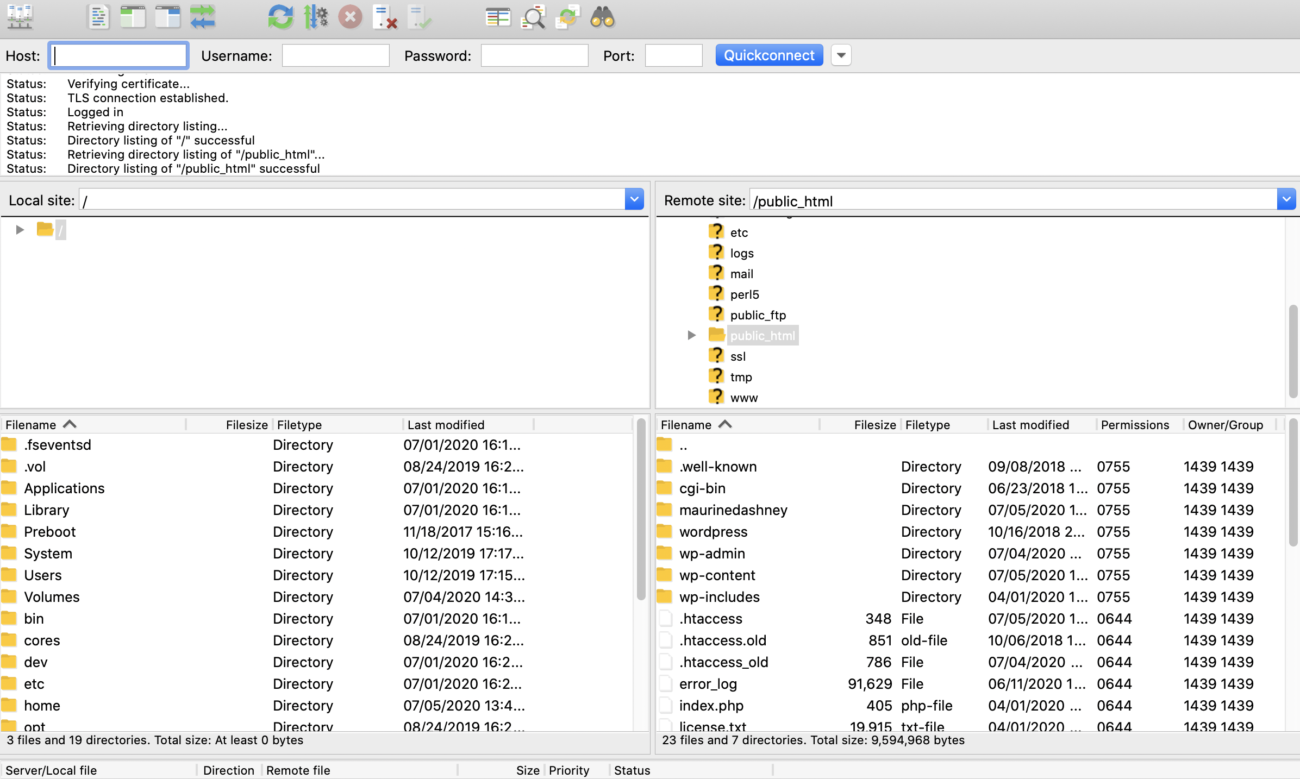
Second, my site’s backup files. These are located in the wp-content folder if you have WordPress. I used FileZilla (FTP software), and it was easier than I expected. All you do is download FileZilla, open it, and type in four things at the top to connect: hostname, username, password, and port. (SiteGround’s FileZilla tutorial told me where to find these things.)
At first I thought it hadn’t connected properly since I got a security message after hitting Quickconnect, but then I clicked around the folders on the right side until I found the wp-content folder. Then I dragged it over to the left, into the computer folder where I wanted it saved, to download it. The downloading process took a couple of hours.
Downloading finished! Now onto easier things.
2. Point your domain name to Bluehost.
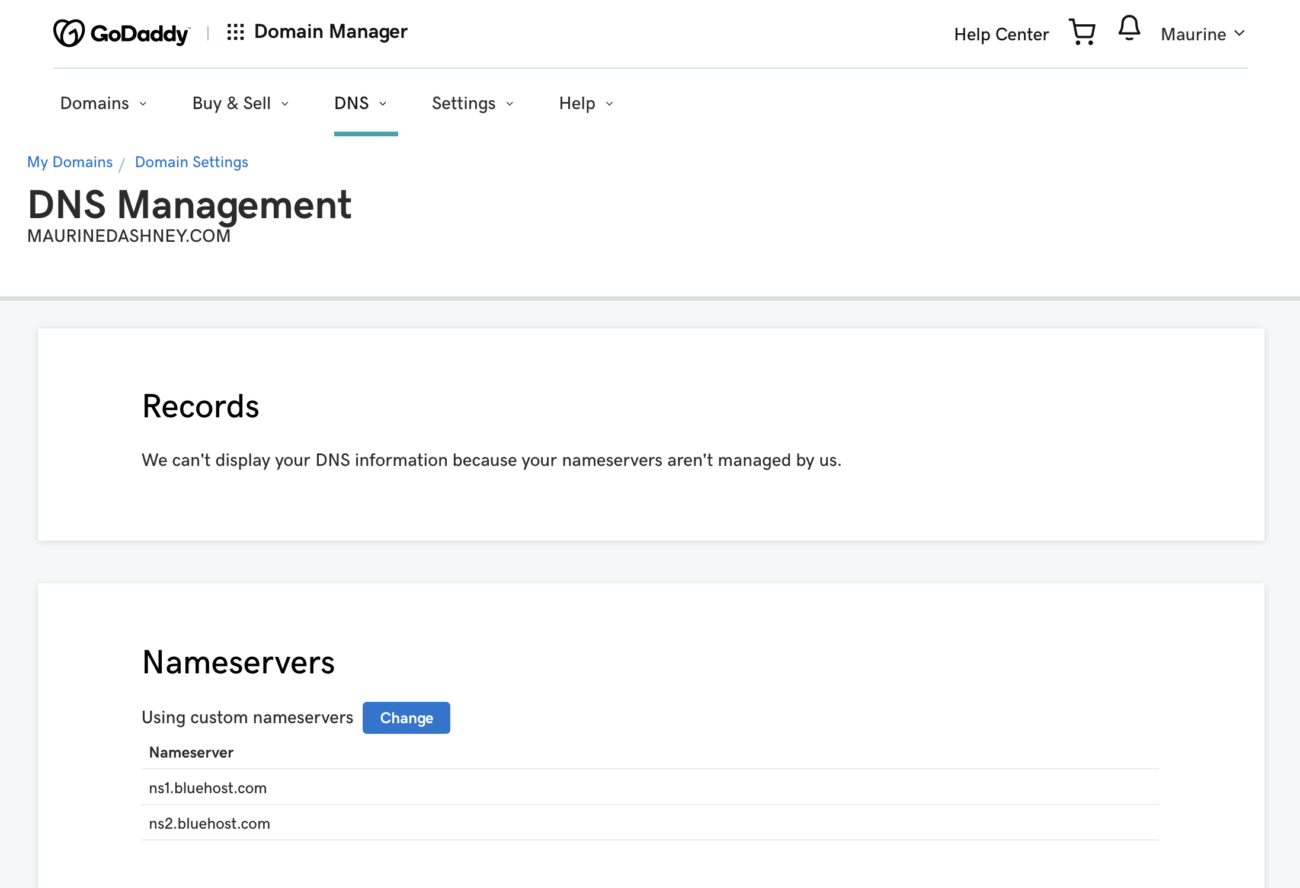
I did this with my domain name registrar (who I bought my domain name from), GoDaddy. I’ll share what I did in GoDaddy, and if you have a different registrar, I’m sure the process is similar.
I logged in, then navigated like so: My Products > Domains > DNS (located underneath the domain I was switching hosts for).
Once there, I changed the information under Nameservers so it would have Bluehost’s nameservers instead of SiteGround’s:
- ns1.bluehost.com
- ns2.bluehost.com
Cool. Onto step 3.
3. Assign the domain in Bluehost.
This is where it may be different for you. I was assigning a domain to Bluehost when I already had one there (May Contain Sugar), so I had to not only assign the domain but also decide how it would be assigned. But here’s what this step looks like:
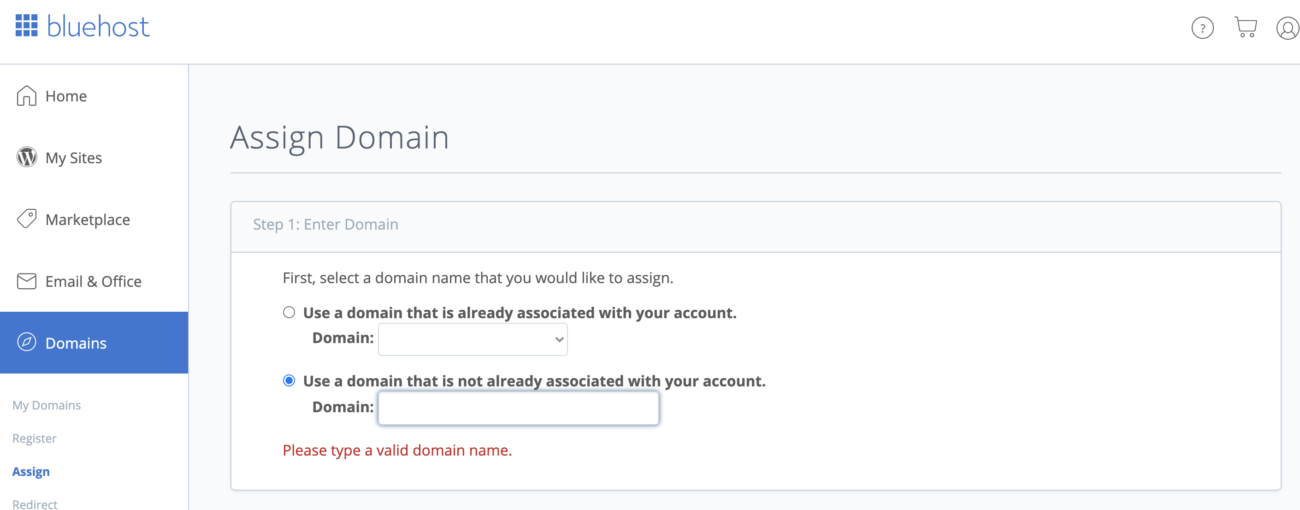
I navigated to Domains > Assign and then followed the steps there. At step 3, it asked me if I wanted to do an addon or parked domain:
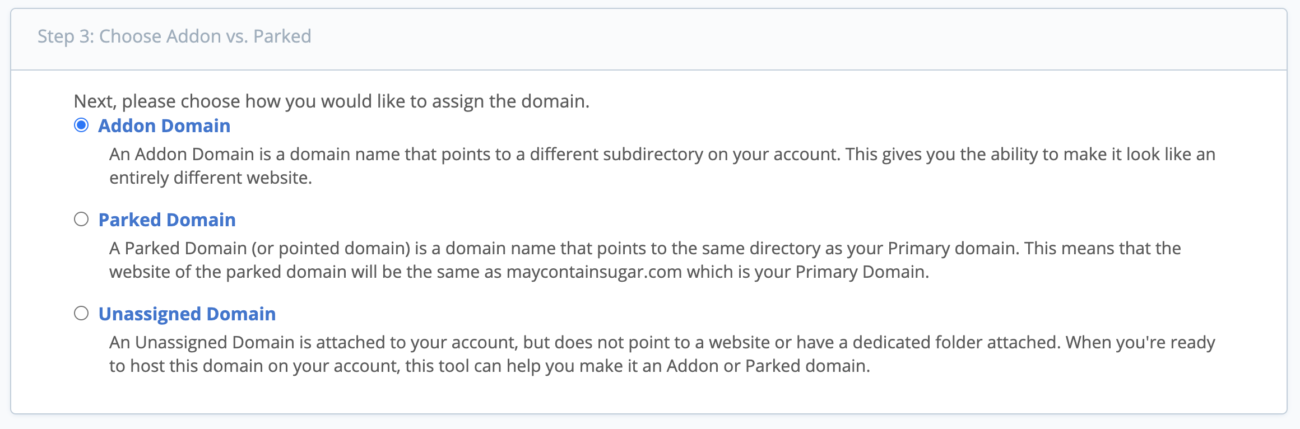
I chose addon because I wanted my websites to stay completely separate. Then, in step 4, it asked me if I wanted to use an existing directory or start a new one:
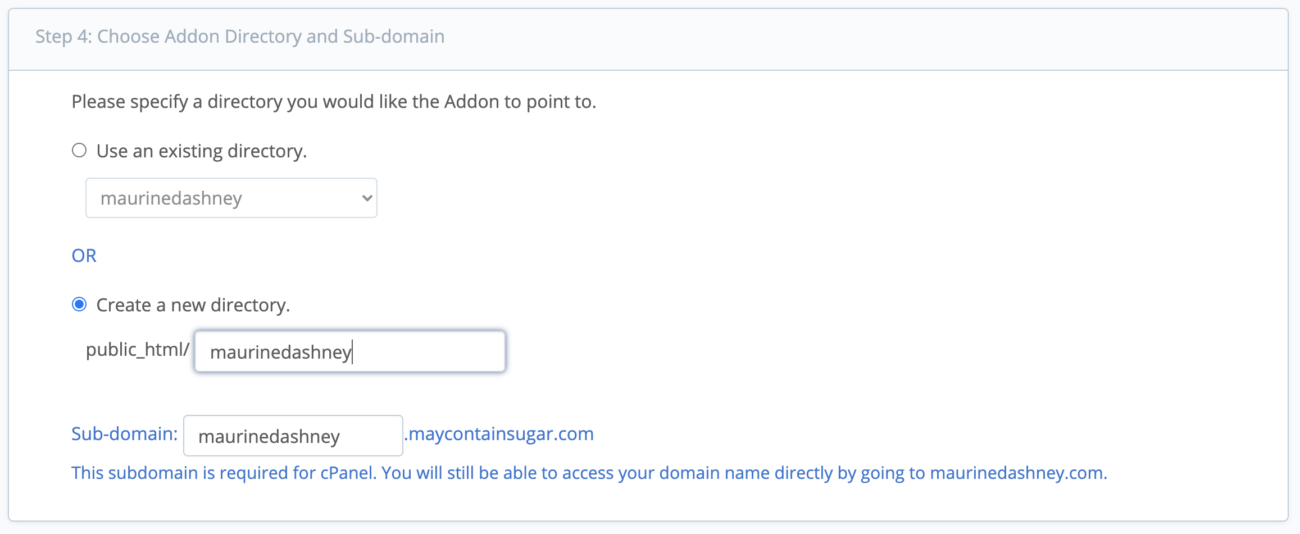
Once you get through all the steps, you can hit Assign and move on.
4. Upload the website backup files and database to Bluehost.
Remember FileZilla? I opened it again, this time connecting with my Bluehost info. (I actually got the Quickconnect info I needed from Bluehost, but you can get it by logging into Bluehost, navigating to Advanced, and looking under General Information on the right side. The shared IP address can be used as the hostname.)
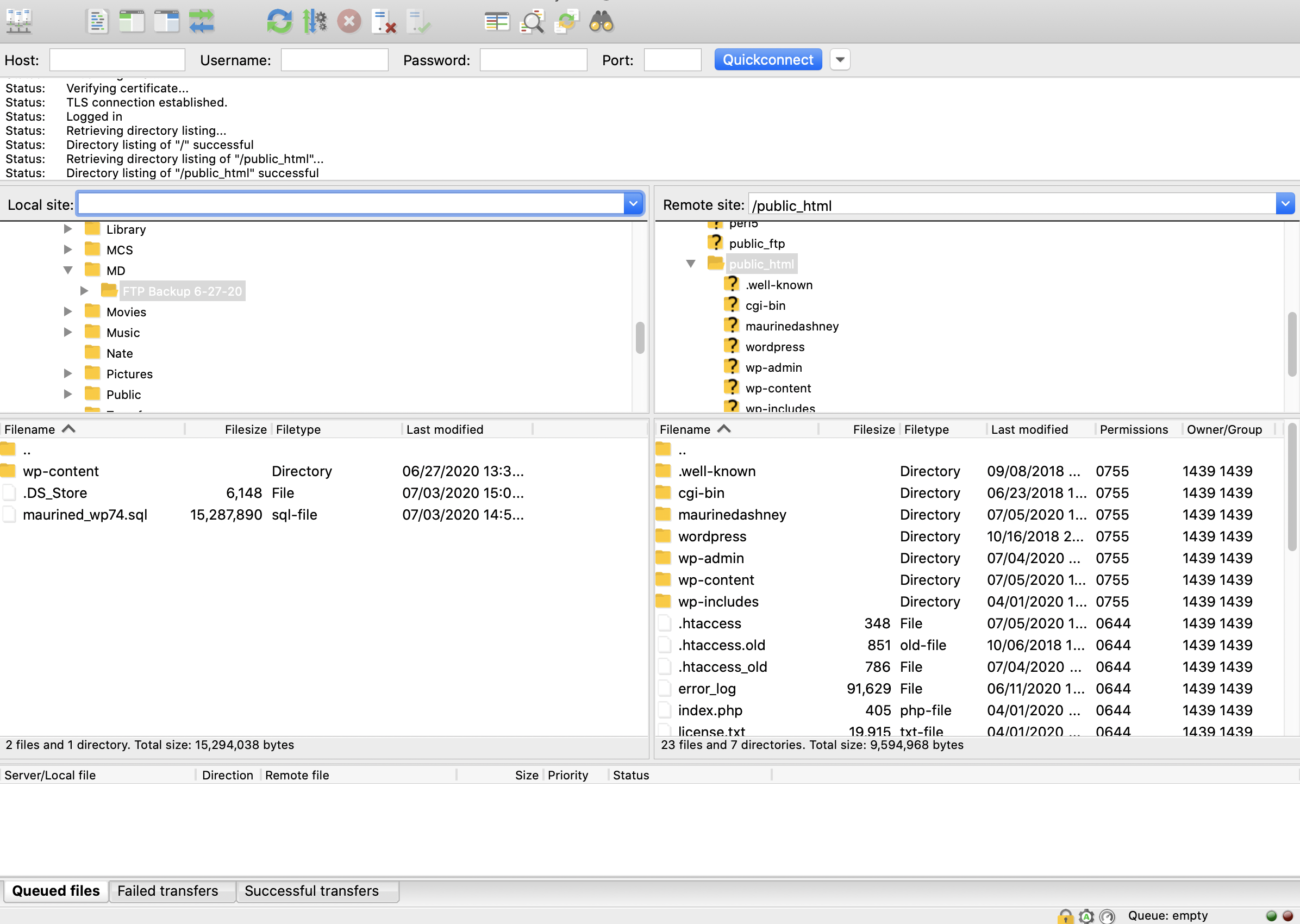
Once I was connected, I found the folder on the left where my downloaded SQL file and wp-content were (from step 1). On the right, I found my site’s public_html folder (it was empty when I first opened it—this is me opening the folder having finished this process). Then, I selected both the wp-content folder and SQL file on the left and moved them into the public_html folder on the right. The uploading process took a couple of hours.
5. Have Bluehost extract the files and get your website up and running.
There really isn’t much explaining to do here, mostly because I didn’t understand it haha. I literally just hopped onto a chat with Bluehost and told them to “extract the files and get my website up and running” since a previous chat agent said I should do that once I finished with step 4. I asked the chat agent, and they did it for me!
6. Wait for all servers to update to your new host.
The final step in this whole process was to have Bluehost install an SSL certificate on my site, but before I could do that, all servers had to reflect my new host. I used whatsmydns.net to check this:
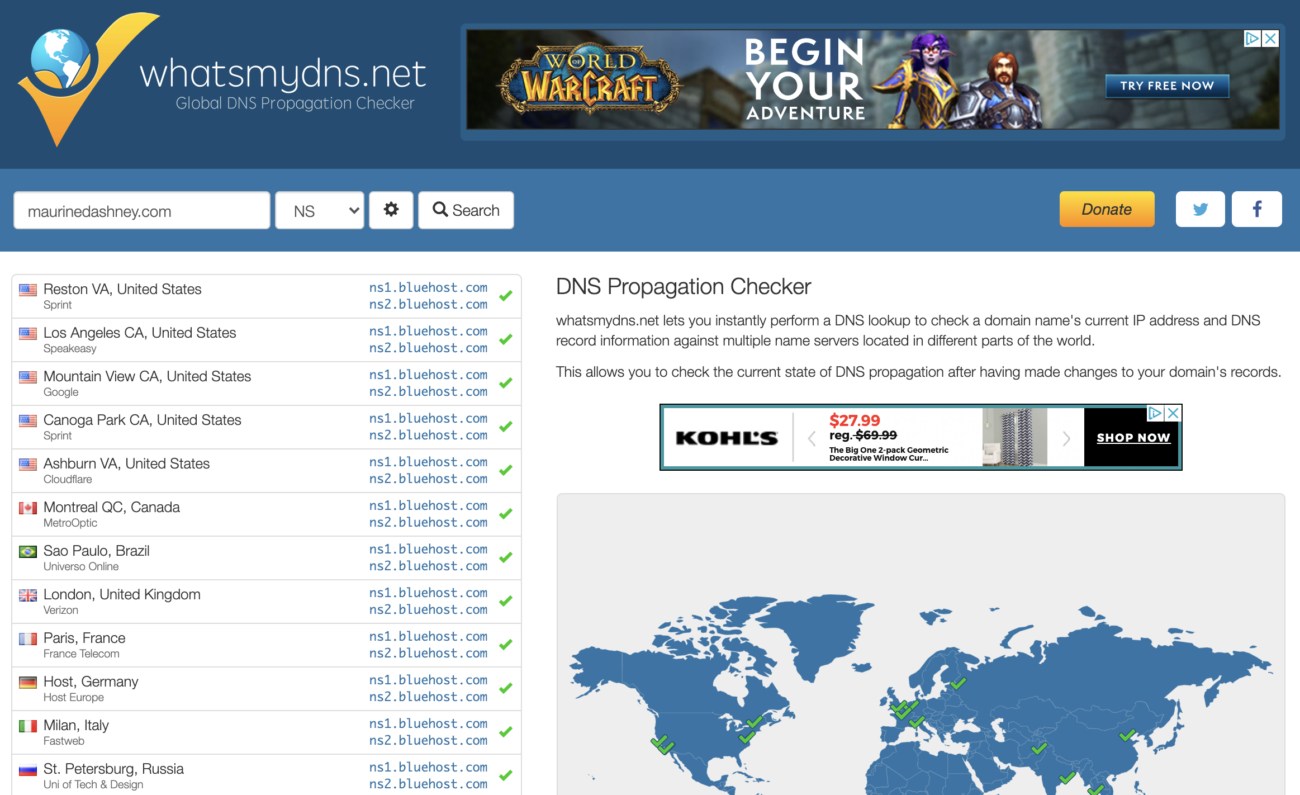
See how everything has green check marks and says Bluehost over on the left? That’s what I wanted.
7. Have Bluehost install your SSL certificate.
Another step that doesn’t require much explanation—I just hopped into another Bluehost chat and asked them to install SSL on my newly transferred site. It took a little fiddling around, but eventually we got it!
And that’s it! I hope this comes in handy for someone who is stressed out about moving web hosts haha.

13 Comments
I am in the same boat (SiteGround to BlueHost) and this post was incredibly helpful. Thanks so much!
So glad I could help, Lisa! I figured there would be other people in the same boat, but no one had posted about it yet. Cheers!
Thanks so much this was very helpful!!! I used this to migrate my site over, there are certainly a lot of steps!
I’m so glad it was helpful, Casey! I felt like I was pulling my hair out going through the process, so I figured I could maybe spare someone the trouble 🙂
Dear Maurine Dashney,
Hello from Bhutan, a tiny Kingdom in Himalayas.
Thank you for the post on how to move web hosting from SiteGround to Bluehost. Followed your steps and made my work easy. I was in same situation as yours.
Just wanted to thank you for the post.
Keep safe and have a wonder life ahead.
Best
Udaya
Wow, I had no idea my little blog post would travel so far! Glad I could help 🙂
I was going to follow your guide to do the exact same thing, but then I noticed Hostinger was cheaper ($60 for 48 months) so I went with them and I’m so glad I did because they had an automatic migration tool that did everything for me in less than 5 minutes. I was astonished. The only thing I had to do was install a new SSL certificate (which took a click of a button) and update the name servers in Namecheap to point to Hostinger’s servers instead of SiteGround and I was done. All in all it took maybe 10 minutes max from start to finish!
That’s awesome, so glad you found an option that works for ya!
Thank you for the tutorial! I used it and just migrated my site from siteground to bluehost. However, all of my spacing and fonts and some of the logos and such are different. Did you have any issues with that?
Oh no, so sorry to hear that! (And apologies for my wildly late response.) I don’t remember that happening to me, but there were definitely odds and ends to clean up. Hoping it’s all sorted now 🙂
Thank you for the tutorial! I used it and just migrated my site from siteground to bluehost. However, all of my spacing and fonts and some of the logos and such are different. Did you have any issues with that?
Your guide is awesome. I’m glad I found it through Google.
What they advise on Blue Host is completely incomprehensible to a non-professional.
Way to go and have a great day.
Ey Maurine,
From Pakistan, just wanted to thank you for the immensely helpful article!
Thank you so much and best of luck with everything!
Have a good one!